
You can use nesting and collapsing to further organize pages on the left navigation menu.
Nesting means that a Page appears below or as a part of the item above it (these Pages will appear to be indented from the Page above them); the Page with items nested below it becomes a Parent Page, meaning that it introduces or controls the items below it.
Collapsing means that nested items become subpages below a Parent Page. Collapsing is singaled by an arrow that will appear to the left of the Page within the left navigation menu, lettings viewers know that the Parent page can be clicked to open or collapse additional Pages.
When collapsing and subpages are used together, the parent page can be made into a heading that, when clicked, will open up collapsed items below, but does not contain Modules or content of its own (it is only a heading for other content below it).
Step 1 | Select the Add/Edit tab to bring up the Edit controls for pages | 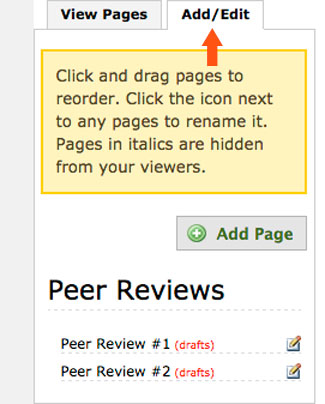 |
|---|---|---|
Step 2 | You can now begin to "nest" items below the parent Page by long pressing over an item and dragging it below and to the right of the parent Page. A nested item means that it is indented from, and controlled by (or subject to) the item above it. The image to the right shows a parent page with 3 pages each nested beneath the item above, with the bottom page in the process of being dragged. Note: Indented space between the controlling Page above, as well as a highlighted and dotted box for a Page being moved, signal when an item is being nested below another Page. | 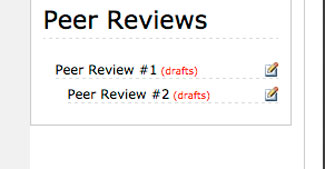 |
Step 3 | To turn nested items into subpages, click the small Edit icon at the end of the Page you wish to change. Note: if you do not see the Advanced Options, click the Show Advanced icon to bring up additional settings. | 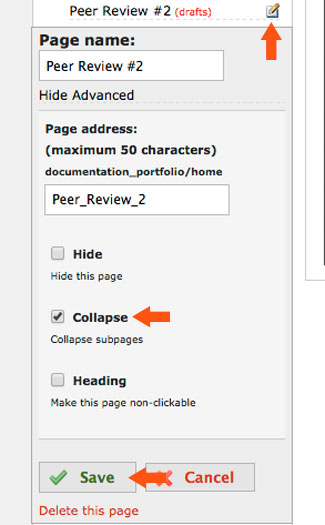 |
Step 4 | Click the checkbox next to Collapse to make that page the parent for other pages to be nested below. Note: Choosing the Heading option will make the selected page a title only - any modules on that page will no longer be viewable, and when a viewer clicks that heading, it will open the first viewable page nested below! | |
Step 5 | Click the Save icon under the advanced edit options to keep your new settings or Cancel or uncheck the box to revert to previous settings. Note: after you save the Collapse setting, you will now see an arrow to the left of your parent page. This icon will open or close the Collapsed items. |
Collapsed Pages or Headings?
A Collapsed Page allows you to use a landing page to introduce and organize work without overwhelming your reader with links to click. The Parent Page within a Collapsed Page can contain modules introducing or reflecting on the material within the nested Pages.
By allowing your reader to choose whether to view all the items below a Collapsed Page or to leave it condensed, you reduce visual clutter and make navigating mid-level Pages easier.
Using a Page as a Heading allows you to put your reader directly into a nested Page below without additional clicking. This option is useful when you will not be writing an introduction to the nested items and want your reader to go directly into the first Page.
It is possible to use more than one Collapsed Page within this left navigation bar, so each item below the main parent Page can be both a nested item and a parent item.
If you have questions about Aportfolio, email us at aportfolio@appstate.edu